In the time I've been playing Diplomacy, I have seen many two-way draws. Most of them have come through a non-DIAS draw vote, with the other players voting themselves out of the draw because their loss was inevitable (although the 2-way wasn't), and the two players preferring to take the two-way draw, rather than play on and risk the other soloing. Some 2-ways have come through care bear play — one player getting to 17, and then holding back and helping their ally get to 17. But only very few have come through two players both playing for their best result, and ending on 17 centres each, without either of them ever having a chance to solo. These genuine 17-17 two-ways are the focus of this article.
Back in the S2001M edition of the Diplomatic Pouch, Glenn Ledder and Karlis Povisils wrote the article Stable Two-Way Draws in Standard Diplomacy. That article looked at the positions in which a stable 2-way draw could theoretically be formed. However, that was as far as it went, and its conclusion was simply that they had to be formed along a stalemate line with 17 centres each side. Now we are going to take the theory back a step, and look not just at where 2-way draws can be formed, but how they can be formed in those positions.
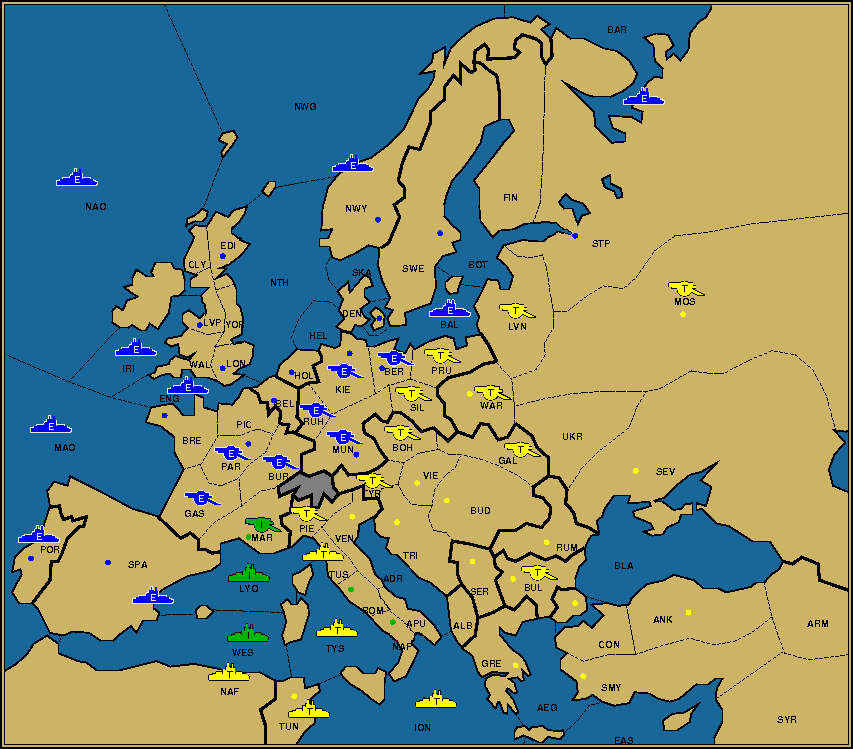
My first ever Diplomacy Tournament outside Europe was at WorldDipCon in 1998, which was held at DixieCon in Chapel Hill, North Carolina. In the team round, I had a huge game. As England, after getting 1 build in 1901, my centre count then went 6, 9, 12, 12, 15 up to 1906. From the position I was in, I probably should have soloed, but the combination of lack of experience (it was only my 10th tournament, and I'd never previously got past 12 centres) and the southern players all working together to stop me, meant that by 1910, the supply centre count was 16(E) — 15(T) — 3(I). I've never been one to take a 2-way if a solo is possible, and those of you who know the Turkish player, Brian Ecton, will know that he is not either. However, the position was perfect for a 2-way � probably the easiest position possible for achieving a 2-way. 12 years on, I can't remember the exact position, but it was something like this:
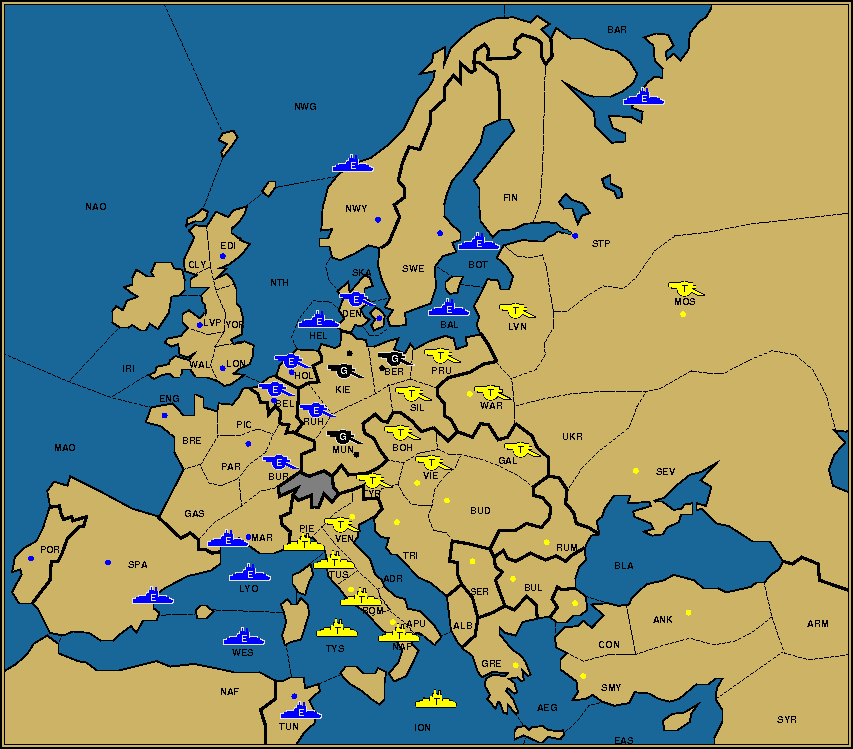
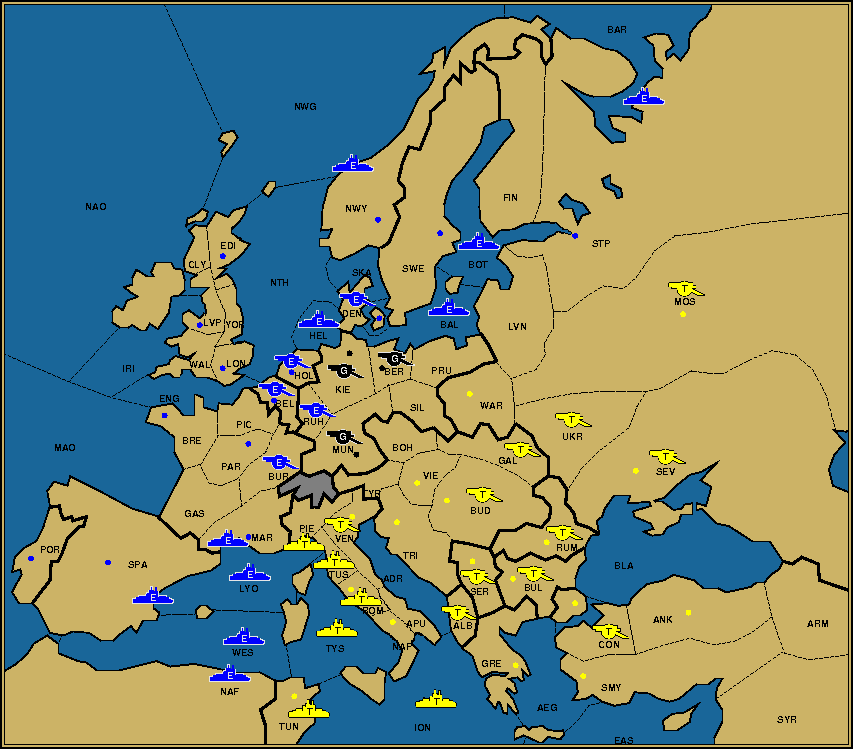
The Northern line from Russia to Switzerland is completely tied up, and doesn't need support from Burgundy to be held. In the south, Marseilles has two supports, as does Spain, so nothing is moving. At this point, Turkey just drops into Naples and Rome. There is nothing Italy can do to stop it. And even if I rush into the Med, there's plenty of time for him to form a line at Tun-TYS-GOL to stop any English solo. And at the same time, Piedmont stops supporting Marseilles, and so a three-way attack from England is enough to force it (and with MAO-WMS, Por s Spa, Bur-Mar, Spain is safe). In one move, Italy falls from 3 to 0, England and Turkey are both on 17, and the stalemate lines are already set up to prevent the solo either way.
While this is the easiest of methods for achieving a 17-17, it also illustrates a number of points which will be common to all the positions examined in this article.
- The starting position consisted of two large powers and one small. There is no point even considering trying to achieve a 17-17 if you're starting from 17-9-8. This would mean that the 9 centre power has to take out the 8 centre power without there ever being an opportunity for the 17 to take, or be given, one more centre. Even 14-12-8 is not a good position to start from.
- From the moment that the move for a 17-17 starts, to the draw being agreed, the small power never has a chance to give a solo to either player. You have to assume that for the third player, a 17-17 is their worst result, and they'd much rather see a solo, to punish one of the players for trying to take them out of the draw.
- Equally, neither large power has a chance to take an 18th centre without the help of the small power. Each power not only has to hold 17 centres, they have to be able to defend those 17 centres at all times.
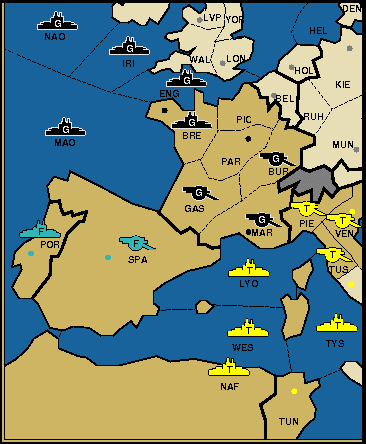
For my next example, I'm once again going to use a game I was involved in as an example — this time an Internet game, so I do have a full record of the position. In this one, I had some major shots at soloing, including ending one Spring with units in 18 centres, but in a position that wasn't holdable in the Fall. It was a no-press gunboat game, so I didn't know until afterwards that my opponent was the soon to be World Champion, Yann Clouet! Someone else who I have no doubt would take the solo if at all possible. In the end, the position came down to a 16-16-2, with France holed up in Spain and Portugal.
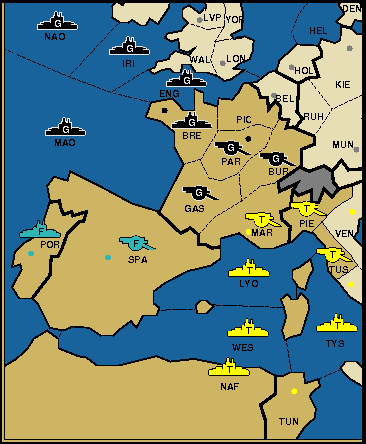
I had indicated the previous turn that I would support a convoy of Tuscany to Spain, so France knew it was coming, but even so, there was nothing he could do other than accept his fate. Gascony only needs one support to stop it falling to an F/T attack, and Marseilles has the two supports it needs to defend against an F/G attack. And so Tuscany was convoyed into Spain (via TYS and Western Med) with support from Marseilles, Gascony and MAO, giving Turkey a 17th centre, which he can then hold without difficulty. But even with Turkey in Spain, the German line is still solid, and so Germany can safely order MAO-Por with support from Spain the following turn to complete the 17-17.
Portugal is a great place for finishing off a 17-17. Because it's only got two neighbours, a small power trapped in Portugal has very few options, and because Spain and MAO both have so many provinces behind them to provide support, any support that the unit in Portugal gives has no effect on the stability of the situation.
So far, we've looked at two positions where the last few centres have been shared between the two large powers, to reach 17. However, it's worth taking another look at the previous example, winding further back a turn, to see that things aren't quite how they appeared. The position was:
(Note that here it is Germany that holds MAR, rather than Turkey)
The position is a stable 17-15-2. However, from this position, there is no way for Turkey to safely take Spain and Portugal to get to 17. Without Marseilles, Spain is not holdable, and so if Turkey had taken Spain with German help, it's perfectly possible that France and Germany would then have combined to support Germany into Spain for the solo. The only way to safely get to 17-17 from here was, as played, to first put Turkey into Marseilles, and then take one of Spain and Portugal each.
That's two 2-way draws achieved by finishing off a small Mediterranean power. Next, let's look at a different area of the map for completing the 2-way: Germany.
Of the three German centres, England needs two and Turkey needs one to make a 17-17. The only stalemate line in this area which splits in this way, is for Turkey to get Berlin, while England gets Kiel and Munich. However, this is highly dangerous. Obviously England can take Kiel easily. However, Germany can then make life difficult in many ways. If England takes Munich next, then he now has three units on Berlin to Turkey's two, so if Turkey doesn't support Berlin (which he can't do if he's trying to take it — or if Germany orders Ber-Kie), then England takes Berlin too, to solo. Similarly, if Turkey takes Berlin first, then he now has four units on Munich, and so can solo himself.
You may think that the best solution is for Turkey to take Berlin and England take Munich at the same time. However, this is also highly risky. Either can renegue on the agreement, instead supporting Germany, and the two of them can then combine to ensure a solo.
In fact the solution is similar to the previous example. The first step is to swap a centre. In this case, Tunis needs to be given to Turkey. England now needs all three German centres. This allows Turkey to pull well back from the German front — creating a DMZ that includes Livonia, Warsaw, Prussia, Silesia, Galicia, Bohemia, Vienna, Tyrolia and Trieste.
This may seem risky, but Turkey is still only one move from all the centres he needs for 17, and in a position where they are quickly held within a stalemate line. England can now take guarantee to take Germany out in two moves, knowing that Turkey is not in a position to interfere. And on the second of the two moves, Turkey can move back up to the stalemate line, to ensure that England does not try and move any further.
This position is actually very similar to the first position we examined, in that the two large powers are using a large band of non-scs as a barrier between themselves as the minor power is taken out. In this case, it's the band through Tyr-Boh-Sil-Pru-Lvn, while in the first example, it was the Western half of the Mediterranean. The difference here is, the large powers had to actively swap supply centres elsewhere in order to create such a position, rather than it happening naturally � much like in the second example.
So, how far do you need to pull back? And indeed, how far can you safely pull back? You need to pull back far enough that the other power can take all the centres from the small power, faster than you can move up to take one of them yourself. In this case, Turkey's biggest threat is that in one move, he can put units in Tyr and Boh. However, this only gives him two units on Munich, while England has three — and this assumes that Turkey can guess which turn England is going to make his first move to attack Germany.
As for how far you can safely pull back, you need to be close enough to the line that if England and Germany jointly jump towards you, you can hold them off. So in this position, the biggest threat is a simultaneous move to Sil and Pru by Germany, and an English convoy into Livonia. This is why Turkey has kept three units next to Warsaw. And while Germany could, in the next move, follow up with his third army, it's going to be very hard for England to push any more armies forwards, without taking German centres, and thus removing the German units from the front line. So this position is about as far back as Turkey can safely retreat. Fortunately, it's sufficient for England to be able to take out Germany safely. If Germany was a centre or two larger, that simply wouldn't be possible. Turkey would have to pull further back from the front line, which would mean that a combined English/German attack could give a solo to England. This is why a 17-17 is only possible when the third power is small.
So where does that leave us?
Well hopefully, you now know how to convert some of your 3-ways into 2-ways, without risking giving away the solo. And you also know when it's just not worth the effort trying, and can take the draw.
And also as a small power in a 3-way, hopefully you can see when your position is safe, and when you are prone to being whittled from the draw, and need to do something about it.
 |
David Norman ([email protected]) |
If you wish to e-mail feedback on this article to the author, and clicking on the envelope above does not work for you, feel free to use the "Dear DP..." mail interface.


