Equations, the fundamentals of the rulesWhen we try to explain to a person how to adjudicate a situation manually, we would probably teach him the simple rule of thumb “cut the support first”. In most common cases, supports can be adjudicated with this rule, which simplifies the situation. However, convoys can mess up the situation pretty badly, as shown in the following example:
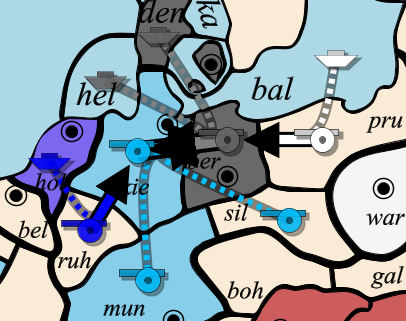
When determining whether the support of Army Holland will succeed, we have to know whether the convoy of Army Yorkshire is disrupted. To determine this, we have to adjudicate the move of the fleet in the Norwegian Sea. This move in turn depends on the support from Fleet Norway, which could be cut by the convoy from Denmark — but only if the fleet in Sweden fails to dislodge the fleet in Skagerrak. We see that the rule of thumb “cut all supports first” does not always work. It is good guidance for manual adjudication, but its use for a more formal description of the rules or an algorithm is questionable. Another notion, which can be found in many adjudicators, is the search for “hotspots”. Consider the following situation:
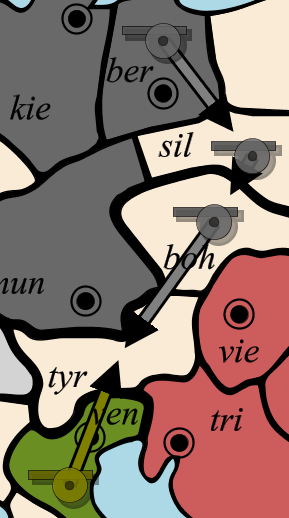
The Berlin, Silesia and Bohemia orders are a chain of moves, where the success of one move depends on the success of another. The head of this chain is considered a hotspot which must be adjudicated first. So if we follow this principle, we start by resolving the conflict in Tyrolia. Since all units trying to move into Tyrolia have equal strength, both Army Venice and Army Bohemia fail to move. After resolving the Tyrolia area, the other orders in the chain can be adjudicated. Although the idea of hotspots looks sound at first sight, things get less clear when a head-to-head battle is involved:
In the situation above, a head-to-head battle takes place between the armies in Kiel and Berlin. Both units attack with a strength of 3, while at the same time, they are stabbed from behind by a foreign unit with one support. Since the situation is symmetric, both Kiel and Berlin could be chosen as a hotspot. If one of the German supports were to be removed, the hotspot would lean to Berlin, while if a French support were to be removed the hotspot would lean to Kiel. Some programs adjudicate this situation incorrectly. They take one of the two areas as a hotspot, depending on how the orders show up in the internal administration. If Kiel is chosen as a hotspot, the result will be that the moves from Ruhr, Kiel and Berlin fail. After this resolution, the algorithm will continue with the other orders. Since the Kiel order has failed, the Russian order will be adjudicated with a positive (but incorrect) result. If instead Berlin is chosen as the hotspot, the army in Ruhr will advance (incorrectly). Both the idea of cutting support first and the notion of hotspots are based on the idea that putting the orders in a sequence will help. The sequence in which the orders are adjudicated is a kind lifeline for the adjudicators based on this principle. For the most common situations, the sequence will indeed help; but for a truly flawless algorithm, things can still get pretty complicated (although not impossible). In these cases the sequence is not a lifeline that rescues by making things simple. On the contrary, it is more like a shark, something that bites and that we want to avoid. To get things under control, we must go back to the fundamentals of the rules. If we take a look at the dislodge rule (page 10 of the 2000 rulebook) we see the following sentence: Support is cut if the unit giving support is dislodged. This rule implies that the move that dislodges the supporting unit must be resolved first. Since the dislodgement can only succeed when the attacker gets its own support, that support must also be resolved in advance. Yet none of these sequence issues are listed by this rule, or in any other place in the rulebook. The rulebook merely gives conditions with which the resolution must comply, but does not give any hint of the sequence in which the orders must be resolved. This means that the rules of Diplomacy are more like “equations”, while in most other games the rules are more procedural. The essential difference between the two approaches is that the equations cannot depend on time. An equation defines a relationship between variables that does not change. It is valid at the start of adjudication, during adjudication, and at the end of adjudication. In contrast, a procedure is executed step by step, and each step may change a variable affecting a later step. This implies that when we construct an equation, obviously we can not make it dependent on time. For instance, the principle “a support is successful until it is cut” means that the resolution of a support changes over time. It may have a different value at the start of the adjudication than at the end. This might work for an algorithm, but is incompatible with equations. On the positive side, an equation may refer to something we don't know yet, while this is considered an error in a procedure. Furthermore, the equation approach is “all or nothing”. We can not describe a part of the rules with equations and another part with a procedure. The rules are either wholly described as equations (the official rulebook), or wholly described as procedure (the DPTG approach). So the challenge is to transform the rulebook into a more formal description, while keeping the idea of equations (and yet avoiding any sequence). We will start with the simpler parts. Prior to this transformation, we assume that orders are checked for geographical limitations, that unmatched orders are removed, and that for units moving to each territory, it is determined whether it is a swap or a head-to-head battle. dislodged
A unit can only be dislodged when it stays in
its current space. This is the case when the unit did not receive a move order, or if
the unit was ordered to move but failed.
If so, the unit is dislodged if another unit
has a move order attacking the unit and for which the move succeeds.
Note, that in the description, the word move is in italics. It refers to the move equation described further down. convoy order
A fleet with a successful convoy order can be
part of a convoy.
A convoy order is successful when the fleet receiving
the order is not dislodged. path
The path of a move order is successful when the
origin and destination of the move order are adjacent, or when there is a chain of adjacent
fleets from origin to destination each with a matching and successful
convoy order. support
A support order is cut when another unit is ordered to move to the area of the supporting unit
and the following conditions are satisfied:
A support is also cut when it is
dislodged. Things get more complicated for the move. For a simple case, where a unit attacks another unit, we have to consider the hold strength of the defending unit (area) and the attack strength of the attacking unit. hold strength
The hold strength is defined for an area, rather than
for an order.
The hold strength is 0 when the area is empty, or
when it contains a unit that is ordered to move and for which the move succeeds.
It is 1 when the area contains a unit that is
ordered to move and for which the move fails.
In all other cases, it is 1 plus the number of
orders that successfully support the unit to hold. The attack strength (sometimes called the “dislodge strength”) is a little bit complicated because it may depend on whether the unit at the destination successfully moves away or not. Consider the following situation:
If the German unit in Warsaw successfully moves away, then the Austrian army in Silesia can use the full attack strength of 2 to capture Warsaw. However, if not, then the German army in Prussia will not help to dislodge its fellow army in Warsaw. attack strength
If the path of the move order is not successful,
then the attack strength is 0.
Otherwise, if the destination is empty, or in a case
where there is no head-to-head battle and the unit at the destination has a move order for
which the move is successful, then the attack strength is 1 plus the number of
successful support orders.
If not and the unit at the destination is of the same
nationality, then the attack strength is 0.
In all other cases, the attack strength is 1 plus the
number of successful support orders of units that do not have the same nationality
as the unit at the destination. In cases where the unit is engaged in a head-to-head battle, the unit has to overcome the power of the move of the opposing unit instead of the hold strength of the area. defend strength
The defend strength of a unit with a move order is
1 plus the number of successful support orders. The final obstacle that an attacker has to defeat is the strength of the moves that compete for the same territory. prevent strength
If the path of the move order is not successful,
then the prevent strength is 0.
In cases where the move is part of a head-to-head
battle and the move of the opposing unit is successful, then the prevent strength is 0.
In the remaining cases the prevent strength is 1
plus the number of successful support orders. The defend strength and the prevent strength have a similarity in that they count the support regardless of the nationality of the support. Some adjudicators use the same function for calculating these strengths, and interpret it as the defend strength or the prevent strength depending on the stage of the algorithm. However, when using equations we can not depend on the stage of an algorithm, and it is vital to distinguish between defend strength and prevent strength. The following example shows how attack strength, defend strength, and prevent strength can each be different for the same move:
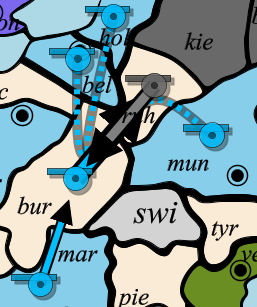
The German army in Ruhr may count the unusual support from Munich in its defense against the attack from Burgundy, so the defend strength of the Ruhr unit is 2. However, the unit in Munich will not help to dislodge its fellow army in Burgundy, so the attack strength of the unit in Ruhr is 1. Since it will be dislodged by the move from Burgundy, it can not prevent the unit in Marseilles from moving to Burgundy, so the prevent strength of the unit in Ruhr is just 0. Finally we can give the conditions that allow a unit to actually move to another area: move
In case of a head-to-head battle, the move succeeds
when the attack strength is larger then the defend strength of the opposing
unit and larger than the prevent strength of any unit moving to the same area. If
one of the opposing strengths is equal or greater, then the move fails.
If there is no head-to-head battle, the move
succeeds when the attack strength is larger then the hold strength of the
destination and larger than the prevent strength of any unit moving to the same
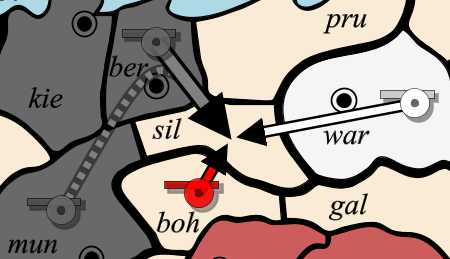
area. If one of the opposing strengths is equal or greater, then the move fails. In case of circular movement or a convoy paradox, the equation may not have exactly one resolution. Sometimes the incompleteness theory of Gödel is suggested, but it is not that complicated. It is just that equations do not always have a single solution. For instance, x2 = 4 has two real solutions, and x2 = -4 has no real solution (for Gödel we should at least introduce an infinite map!). In these situations we set aside the equations, and pass the troublesome part to what I call “the backup rule”. For circular movement all the move orders in the circle must succeed, and for convoy paradoxes a paradox rule should be used. Recently programmed adjudicators, such as jDip, DipTool, Palmpolitik, Paradox Interactive, phpDiplomacy (and its derivate Facebook diplomacy), Stabbeurfou, and Politics have opted for the Szykman rule for dealing with paradoxes. This rule says that the convoy part of the paradox must be treated as disrupted, and the other units are adjudicated normally (although originally it was formulated differently). Some conditions expressed in the equations have a one-to-one relation with the official English rulebook. The conditions that cut a support can literally be found in the rulebook. Other parts — for instance, the strength values — are expressed somewhat differently in the equations as compared to the rulebook. Consider the following situation:
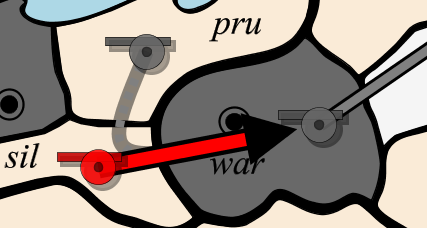
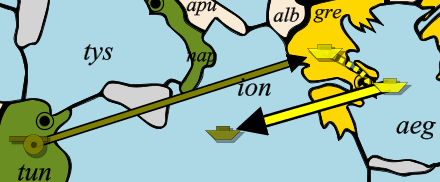
To a certain extent, the rulebook sees the Silesia area as a single conflict that must be adjudicated. And as explained earlier, some adjudicators see the Silesia area as a hotspot and look for the unit with the highest support (Berlin in this case). That unit succeeds, and the other units fail to move. The equations are different, in the sense that the conditions for success and failure are given for each of the moving units separately. The Berlin unit succeeds in its move because the attack strength is higher than the prevent strength of the other units. The other units fail because their attack strength does not beat the prevent strength of Berlin. In the equations, the convoy order can succeed or fail. It is more common to talk about a whole convoy being disrupted instead of a single convoy order: however, considering the convoying fleet separately has its advantages when resolving a convoy paradox with the Szykman rule. Consider the following situation:
The army in Tunis plays a major role in this convoy paradox. However, the resolution of the order is of no importance, because the army would always fail to move even if the attempt to cut support succeeded. One could argue (this will also be discussed later on in this article) that the resolution of the Tunis order is not part of the paradox. Applying the Szykman rule would let the Tunis move fail. This means that the backup rule has a consequence beyond the paradox. This is not directly problematic, but it is just easier to say that the convoy order of the Ionian Sea fails (and can not take part in a convoy route). Adjudication of the other orders can then continue as normal. Although the equations are not an exact one-to-one translation of the official English rulebook, they are close enough for discussing them properly. In this discussion we don't have the burden of the sequence in which the orders must be adjudicated and this keeps the complexity of checking the equations with the rulebook within proportions. Still, the equations do not tell us how to adjudicate. In the next chapter we will take the first steps in transforming the equations into a usable algorithm.
|